| Note: This documentation refers to beta software, which is unfinished. Furthermore, it was compiled using an earlier version than the latest available. Updates and suggestions to this documentation are encouraged! |

Put the MUCK's hostname (or server name) and port number on the first line. If your MUCK lists them both together, for example "muck.server.net:2069", separate them out: the part before the colon is the hostname, the part after the colon is the port number.
To connect to the MUCK, it is usual to have to type "CONNECT characterName password". M-MUCK can do this for you, if you type your character name and password into the second line. You can leave them out if you don't want them to be stored.
Once you have typed in all this information, you probably won't want to type it all in again. You can choose to save it in one of ten "slots", using the controls at the bottom of the window. Use the drop-down on the right to select the "slot" you want to save the information in, then click "Save settings to slot". You will see the configuration appear in that slot in condensed form. You can use all ten slots to store different MUCKs, or even different characters on the same MUCK.
When you've finished, and saved your details, click Connect. The Connect window will disappear and you will be connected to your MUCK.
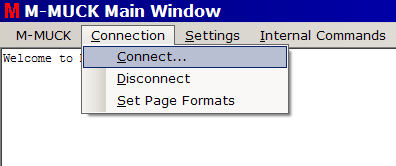
There is only one thing left to do, and that is to set up the connection to work fully with M-MUCK. To do this you need to send a series of commands so that M-MUCK receives pages, whispers and other system messages in the format it expects them. This is not done automatically, to give you the chance to try M-MUCK without irrevocably changing your settings. To do this, select "Set Page Formats" from the Connection menu. You will see a few messages to say you're now receiving the messages in the new format.
The good news is, that's all you have to do. The better news is, you only have to do that once. You've given M-MUCK all the information it needs to connect you to your MUCK every time. If you have two characters and/or two MUCKs (or more!) you can either disconnect from the MUCK and repeat these steps for each one right now, or you can just do it the first time you want to use them. The process gets easier each time as you remember more of what to do. Just remember to select a different slot for each one, or you'll overwrite a previously-saved character.
The text in the main window is displayed in a font of your choosing. There is a "Font" option on the Settings menu to let you change it. You may need to restart M-MUCK for the change to take effect, but it might work without, please let me know. Any change to this setting applies to all current and future query windows immediately, too.
To page or whisper to someone from a query window, all you have to do is select Page or Whisper from the top of their query window, type what you want to say, and press return. M-MUCK will convert what you've typed into the appropriate command, and send it to the MUCK for you. And what's more, if they suddenly switch from whispers to pages, or vice versa, M-MUCK will follow their lead and switch the setting for you. You can, of course, change it back.
Query windows are much more than just conversations, though. At the moment, M-MUCK stores the descriptions of everyone you've looked at, and displays it in any query window they open with you in the future. Never again will someone paging you out of the blue make you rack your brains to try to remember who they are. There are plans afoot to include even more information in query windows. I personally have a very poor memory, so I'm fully aware that storing all this information on the user's computer could be seen as a purely selfish gesture. But it's there, if you need it.
And the best thing about M-MUCK's automation is, if you don't like either or both of those, you can turn them off.